
Переходник с HDMI на DVI
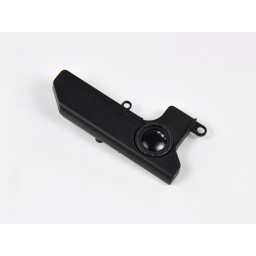
3/8-дюймовый сабвуферный купол Mini не скоро лопнет в наушниках.
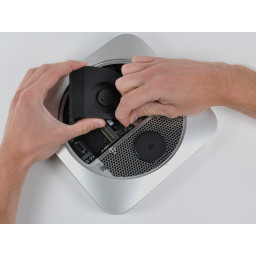
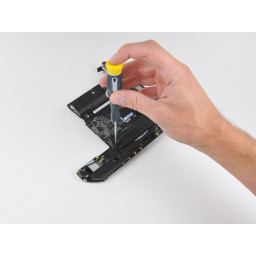
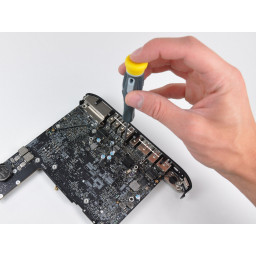
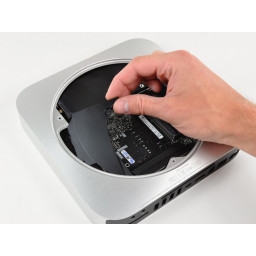
После отсоединения кабеля питания блок логической платы выдвигается наружу.
ИК-датчик / приемник расположен на оптическом приводе рядом с верхним правым краем.
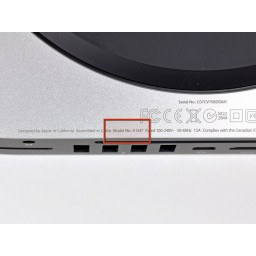
Mac mini Late 2014 сохраняет идентификатор номера модели A1347, но отличается номером EMC 2840.

Существует определенная разница в высоте между серединой 2010 года и предыдущими итерациями.
После продолжительного покачивания антенная пластина может выскользнуть из-под края наружного корпуса.

Мощность переменного тока в
Встроенный 10/100 / 1000BASE-T Ethernet
Четыре порта USB 2.0, по сравнению с предыдущим Mac Mini
Слот для SD-карты

Ну что у нас тут? Это новый оптический привод? Почему это так!
Hitachi-LG Data Storage (HLDS) Super Multi DVD перезаписывающее устройство модель GA32N
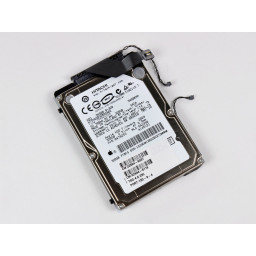
Гибкий кабель жесткого диска
Гибкий кабель оптического привода (в модели сервера это второй гибкий кабель жесткого диска)
Чрезвычайно высокая плотность лопастей воздуходувки выталкивает большое количество воздуха при минимальном уровне шума.
В бессмертных словах Гертруды Стайн: «Это урок, который преподает история:« Повторение »» (иными словами: Apple не падает далеко от дерева.)
К сожалению, мы еще не дома свободны. Один конец антенного кабеля Wi-Fi надежно прикреплен к пластине, а другой конец привинчен к плате логики.


Как и его двоюродный брат iMac, Mac Mini наконец-то прощается с внешними адаптерами переменного тока.
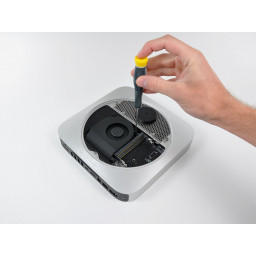
Святые конденсаторы! Осторожно, кончики пальцев.
В соответствии с его компактной конструкцией ребра, направляющие воздух к вентиляционному отверстию, наклонены для лучшего размещения вентилятора.
Macminicolo разобрал нового Mini. Проверьте это, если хотите увидеть, как Apple спрятала второй жесткий диск.
Спасибо за то, что следили за в этот исторический момент. До скорого!
Этот маленький парень поставляется с двумя слотами SO-DIMM, способными поддерживать до 8 ГБ оперативной памяти.
Наш базовый блок был снабжен двумя гигабайтами оперативной памяти.
У нас .
Щелчок нашего ~~ открывателя для бутылок ~~ пластикового открывающего инструмента снимает эту (нижнюю) крышку.
Ну, это было приятно! Но теперь нас встречает нечто новое: сплошная дверь, где когда-то был .
На этой картинке больше видны две рамочные антенны ввода / вывода. Длинные антенные провода периодически заземляются по длине, предположительно, для лучшей передачи сигнала в важную часть — сами антенны.
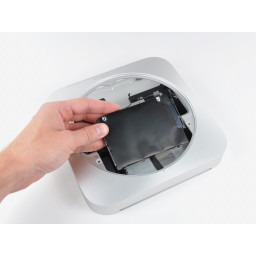
К сожалению, в нашей несерверной модели есть только один жесткий диск.
Нужно больше памяти? Только время покажет, будет ли этот Mac Mini столь же , как и его предшественник. На данный момент мы рекомендуем просто получить серверную версию.

В использовании цельной конструкции Apple пришлось проявить творческий подход к размещению антенн. Две вспомогательные антенны представляют собой квадратные стальные компоненты, видимые на обоих концах рамы ввода / вывода.
Mac Mini Mid 2010 имеет беспроводную сеть 802.11n Wi-Fi, а также Bluetooth 2.1 с технологией Enhanced Data Rate.
После отсоединения оставшихся двух антенных разъемов и кабеля для передачи данных плату AirPort можно легко извлечь из платы логики.
Пустой разъем теперь заполнен — кабелем PCIe, приклеенным к верхней части лотка жесткого диска.
Твердотельный накопитель соответствует тому, который мы нашли в с теми же чипами:
Флэш-контроллер Samsung S4LN053X01-8030 (ARM)
8 x 16 ГБ флэш-памяти
Samsung 512 МБ ОЗУ
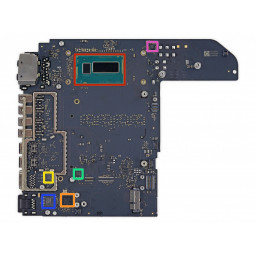
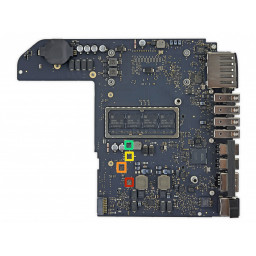
Процессор Intel Core с Intel HD Graphics 5000
Texas Instruments / Stellaris Микроконтроллер
Парад Повторитель очистки джиттера HDMI
Macronix 64 МБ CMOS Serial Flash
Delta Electronics LFE8904C-F Дискретный сетевой фильтр
Intersil 958 26AHRZ M419VL
Измерение 1,4 х 7,7 х 7,7 дюйма и весом всего 3 фунта, это действительно один для книг.
Черный логотип и другие акценты прекрасно сочетаются со стилем iPad от Apple и последних iMac. Поздравляю, Мини, ты больше не паршивая овца семьи!
Номер модели для этого нового устройства — A1347.
Мозги устройства имеют:
графический процессор с 256 МБ общей памяти DDR3 SDRAM
Другие известные чипы включают в себя:
встроенный гигабитный контроллер Ethernet и устройство чтения карт памяти
Аудиоконтроллер Cirrus 4206ACNZ
фильтр дискретных локальных сетей
Технология микрочипа Датчик температуры шины управления системой (SMBus)
Cypress Semiconductor enCoRe II Низкоскоростной периферийный USB-контроллер
Texas Instruments DDR3 Memory Power Solution Синхронный контроллер Buck
Texas Instruments Синхронный Бак Блок питания NexFET Пара MOSFET
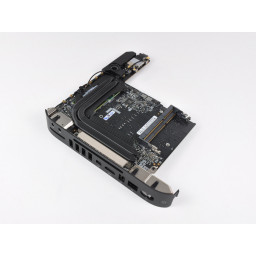
Заправленный под лоток: жесткий диск HGST на 500 ГБ, 5400 об / мин, шириной 2,5 дюйма и толщиной 7 мм.
И на верхней части лотка — многообещающая точка крепления для PCIe SSD в стиле лезвия, предположительно та, которую мы найдем в Mac mini, оснащенном Fusion Drive.
Чтобы проверить, насколько многообещающе мы взяли SSD из нашего (и использовали его крепежный винт).
Прошло два года с тех пор, как Mac mini последний раз появлялся в таблице разборок , но на этой неделе в линейку Apple входит обновленная версия. Это действительно обновленный мини или просто мини-обновление? Следите за новостями, чтобы узнать, что два года инноваций говорят сами за себя — это время простоя Mac mini.
Следуйте за нами на , или для получения последних новости.
В то время как в прошлых Mac mini использовались два порта SATA, что позволяло пользователям с помощью дополнительного жесткого диска, в этом году мы получили только один.
Тем не менее, этот пустой разъем здесь вполне может быть местом для кабеля PCIe, что позволяет устанавливать блейд-SSD.
Подробнее об этом, как только мы получим в руки Mac mini с Fusion.
iFixit Mac Mini Model A1347 Desktop, Kitchen Appliances PDF Teardown Manual (Updated: Wednesday 15th of March 2023 07:07:05 PM)
Compatible devices: EL-PIR70, Silverline SL-1511, MUM 4420 UC, RHFS02, 350.043UK, AroDeluxe-120, CH1322D, Boss To Go Grind & Mill.
- Text Version of iFixit Mac Mini Model A1347 Teardown Manual
- Apple Mac mini (A1347)
- Mac mini box
- Mac mini in box
- Mac mini cords, documentation, and system disc
- Mac mini box contents
- Mac mini — Top
- Mac mini — Bottom
- Mac mini — Ports
- Removing the Mac mini Wi-Fi antenna plate screws
- Removing the Mac mini RAM chips
- Mac mini 2GB RAM
- Mac mini RAM chips removed
- Mac mini with RAM chips removed
- Mac mini Wi-Fi antenna plate — Top
- Mac mini Wi-Fi antenna plate — Bottom
- Mac mini with Wi-Fi antenna plate remove
- Removing the Mac mini cooling fan
- Lifting out the Mac mini cooling fan
- Mac mini cooling fan — Top
- Mac mini cooling fan — Bottom
- Mac mini with cooling fan removed
- Mac mini heat sink cowling
- Removing the Mac mini heat sink cowling
- Mac mini with heat sink cowling removed
- Removing Mac mini logic board screws and standoffs
- Removing a standoff on the Mac mini logic board
- Mac mini heat sink screw
- Second Mac mini heat sink screw
- Mac mini hard drive screw
- Mac mini main logic board connectors
- Mac mini hard drive and optical drive connectors
- Mac mini drive thermal sensors and IR sensor connectors
- Mac mini logic board remove holes
- Use screwdrivers to pry loose the Mac mini logic board
- Mac mini main logic board separated from unibody enclosure
- Removing the Mac mini hard drive
- Mac mini 320GB hard drive
- Mac mini with hard drive removed
- Disconnecting the Mac Mini logic board power connector
- Mac mini main logic board with heat sink, speaker, and wireless card
- Mac mini main logic board — Ports
- Mac mini heat sink (attached)
- Mac mini internal speaker and wireless card
- Mac mini logic board — Bottom
- Mac mini logic board system battery
- Mac mini logic board — Back closeup
- Mac mini speaker
- Mac mini Airport Extreme card — Top
- Mac mini Airport Extreme card — Bottom
- Lifting away the Mac mini’s heat sink
- Mac mini A1347 CPU and GPU
- Mac mini main logic board — Top
- Mac mini heat sink — Top
- Mac mini heat sink — Bottom
- Mac min with main logic board removed
- Mac mini power supply — Top
- Mac mini power supply — Bottom
- Mac mini with power supply removed
- Mac mini optical drive — Top
- Mac mini optical drive — Bottom
- Mac mini unibody enclosure — Front
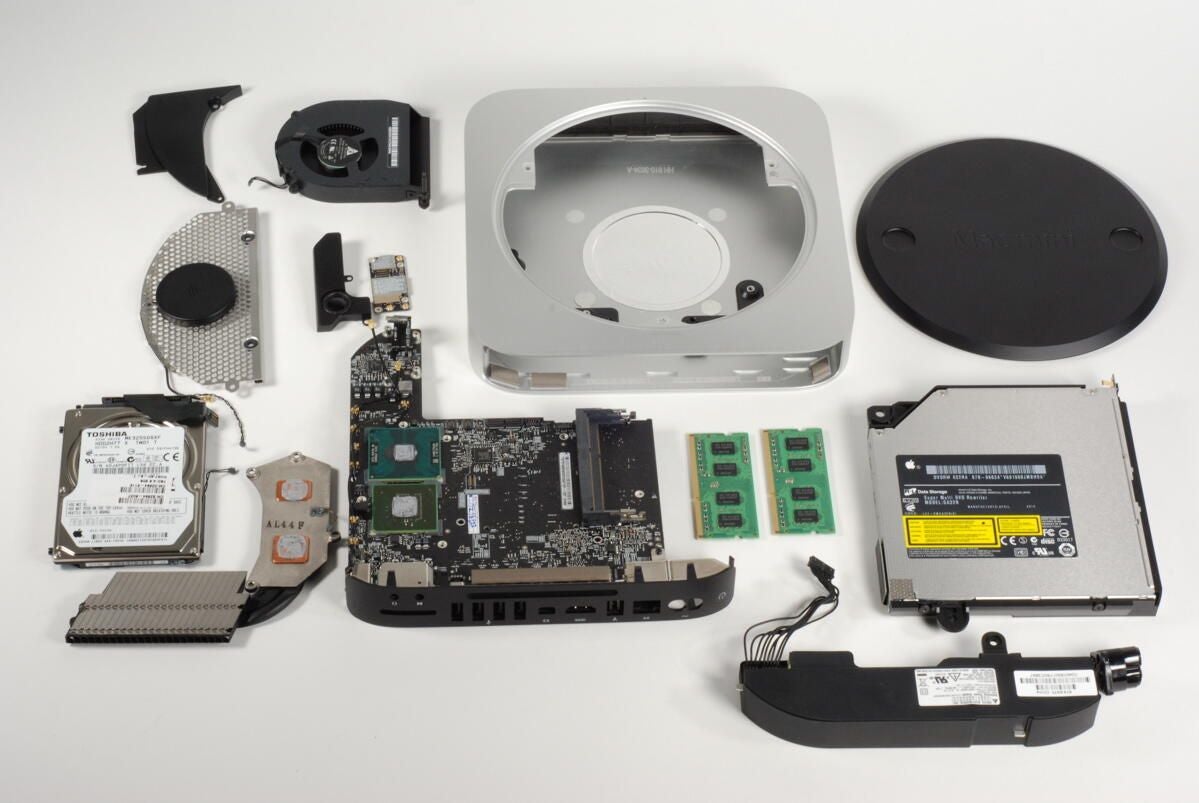
- Mac Mini complete teardown
- Additional Information
- Models
Text Version of iFixit Mac Mini Model A1347 Teardown Manual
(Ocr-Read Summary of Contents, UPD: 15 March 2023)
Внутри нет клея, который нужно удалить при разборке мини.
С надлежащими инструментами разборка проста и понятна.
Винты T6 Torx Security предназначены для того, чтобы вытащить вас из мини-камеры и затруднить очистку вентилятора или замену жесткого диска.
Процессор припаян к плате логики и не может быть обновлен пользователем.
Оперативная память теперь также припаяна к плате логики и не может быть обновлена пользователем.
Прошло совсем не так, как раньше прошлых лет. Эта карта AirPort теперь является полноценной PCIe, поддерживающей Wi-Fi AC.
Давайте посмотрим на микросхемы, найденные на карте AirPort:
Broadcom 5G WiFi 3-Stream Gigabit Transceiver 802.11ac
Skyworks Двухдиапазонный интерфейсный модуль WLAN 802.11a / b / g / n / ac WLAN
RFFM4293 2,5 ГГц FEMS и RFFM4591 5 ГГц FEMS
Broadcom Одночиповое решение Bluetooth 4.0 HCI с поддержкой Bluetooth с низким энергопотреблением
Разъемы внутри этой машины выглядят вполне совпадающими с разъемами, присутствующими в текущей линейке продуктов Apple Здесь нет ничего нового.
Все три винта вентилятора изолированы резиновыми амортизаторами; особенность, не замеченная на старых машинах Apple. Низкий уровень шума и вибрации являются значительными преимуществами для Apple в эти дни, а низкий уровень холостого хода нового Mini в 14 дБ является свидетельством этих целей дизайна.
Samsung K4E8E304EE-EGCE 8 ГБ LPDDR3 DRAM (8 ГБ x 4 = 32 ГБ = 4 ГБ)
К сожалению, ОЗУ «припаяно» к логической плате. Это означает, что если вы хотите обновить ОЗУ, вы можете сделать это только во время покупки.
Аудиокодек Cirrus Logic 4208-CRZ (вернувшийся чемпион из множества последних продуктов Apple, включая и )
Broadcom Ethernet-контроллер PCIe с устройством чтения карт SD3.0 и ASF 2.0
Intel Контроллер Thunderbolt 2
NXP 6142F и NXP 8-разрядный расширитель ввода / вывода
Это самый маленький винт Torx Security, который мы когда-либо видели, — наши комплекты переходят на T7 Security, поэтому мы попросили нашу команду разработчиков инструментов импровизировать.
Импровизация завершена! Наши инженеры Packrat создали единственную прототипную отвертку T6 Torx Security, инструмент, от которого мы изначально отказались, потому что никто не видел, чтобы такой винт использовался в реальной жизни.
«Мы доставим этого смешного водителя в магазин в ближайшее время».
«Усовершенствованный гидравлический подшипник»
Хм. Интересно. Что такое усовершенствованный гидравлический подшипник? Давайте разберемся. Согласно :
AHB «состоит из полированного стального вала, спеченного подшипника и жидкой смазки». В этой системе «нет контакта между валом и подшипником», и, следовательно, «нагрузка на подшипник переносится исключительно пленкой жидкой смазки».
AHB лучше всего подходит для вентиляторов, которые работают на более низкой скорости. Он лучше поглощает удары и гасит вибрацию, чем традиционные шарикоподшипники, что делает вентилятор тише.
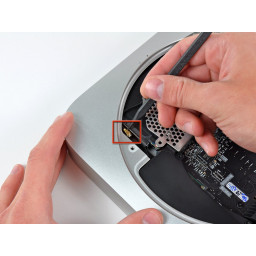
В корпусе Mini есть два глухих отверстия, которые предназначены для концов инструмента для удаления U-образной логической платы Apple.
Будучи механикой шейдтри, которой мы являемся, мы решили обойти специальный инструмент Apple в пользу чего-то, что просто отлично работает, сохраняя при этом лишние доллары из карманов мистера Джобса.
Теперь у нас есть собственный (показанный на втором рисунке), разработанный с прорезиненной рукояткой с высоким крутящим моментом, для точных спецификаций, необходимых для удаления логической платы без риска вставки абразива. инструменты в тонкую логическую плату.
Apple Mac mini 2010 (A1347) Teardown
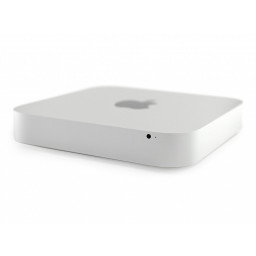
Apple Mac mini (A1347)

Mac mini box
Our base model Mac Mini (A1347) cost $699 (US) and came with a 2.4GHz Intel Core 2 Duo CPU, 2GB RAM, 320GB hard drive, 8x double-layer SuperDrive, NVIDIA GeForce 320M GPU, and Mac OS X Snow Leopard.
Photo credit: Bill Detwiler / TechRepublic
Mac mini in box
Lifting the top off the Mac mini box, we get our fist look at the A1347’s aluminum unibody enclosure.
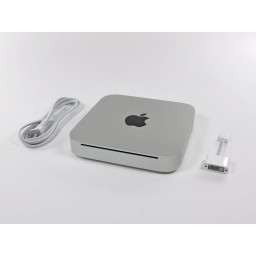
Mac mini cords, documentation, and system disc
Under the Mac mini, you’ll find the rest of the box contents.

Mac mini box contents
Included with the Mac mini is the power cord, HDMI to DVI adapter, documentation, and OS disc.

Mac mini — Top
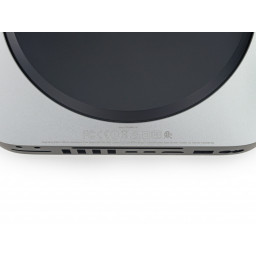
The new Mac mini is significantly thinner than previous versions, and continues the line’s minimalist design. The front of the computer has only the power/activity light and disc slot.

Mac mini — Bottom

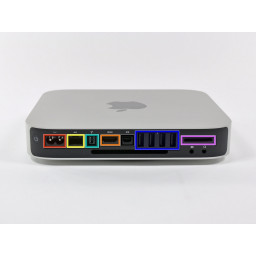
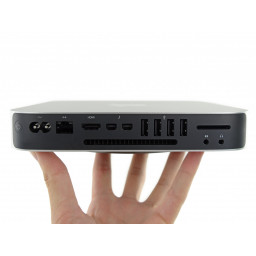
Mac mini — Ports
Along the back of the Mac mini, are the power button, AC power input, 10/100/1000BASE-T Ethernet port, Firewire 800?port, HDMI out, Mini DisplayPort four USB 2.0 ports, SD card slot, audio line in minijack, and audio line out/headphone minijack.
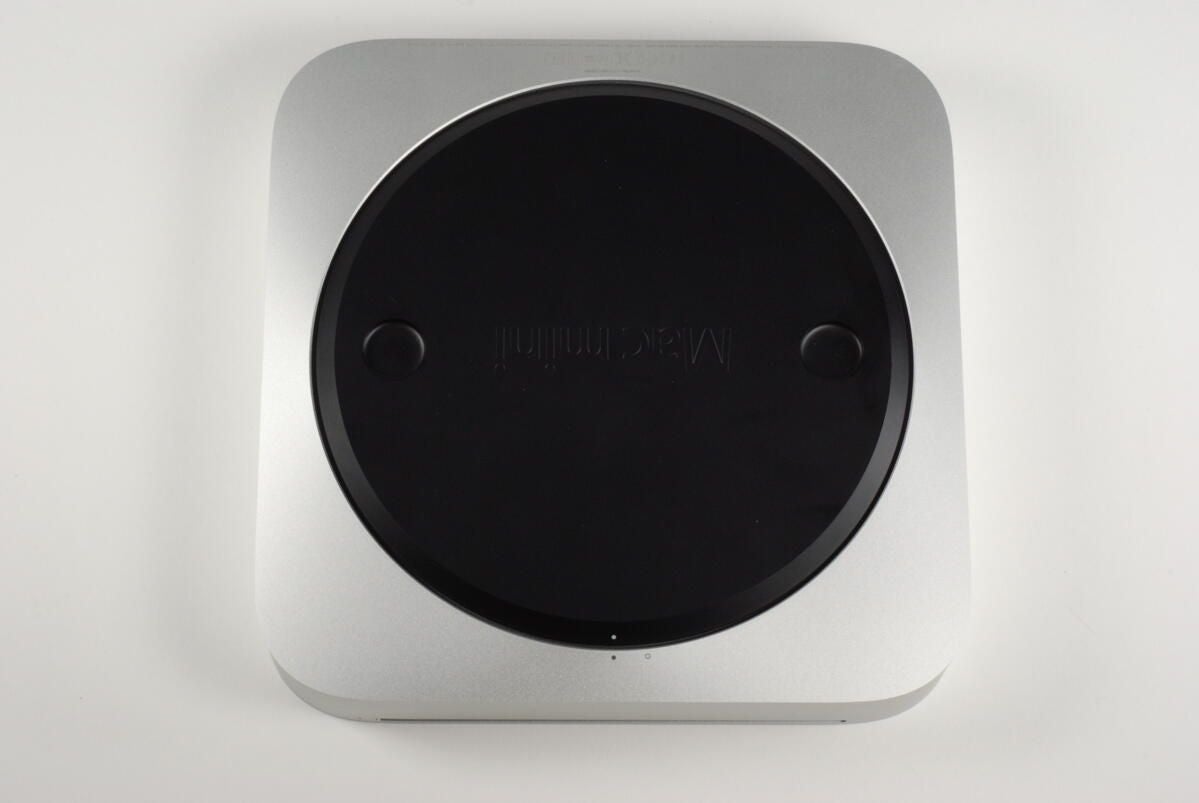
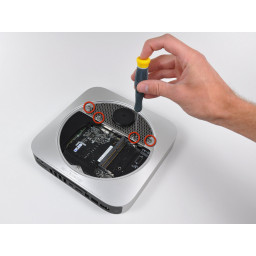
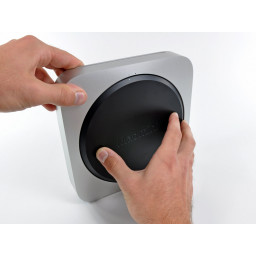
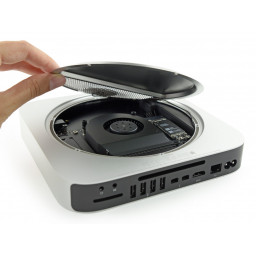
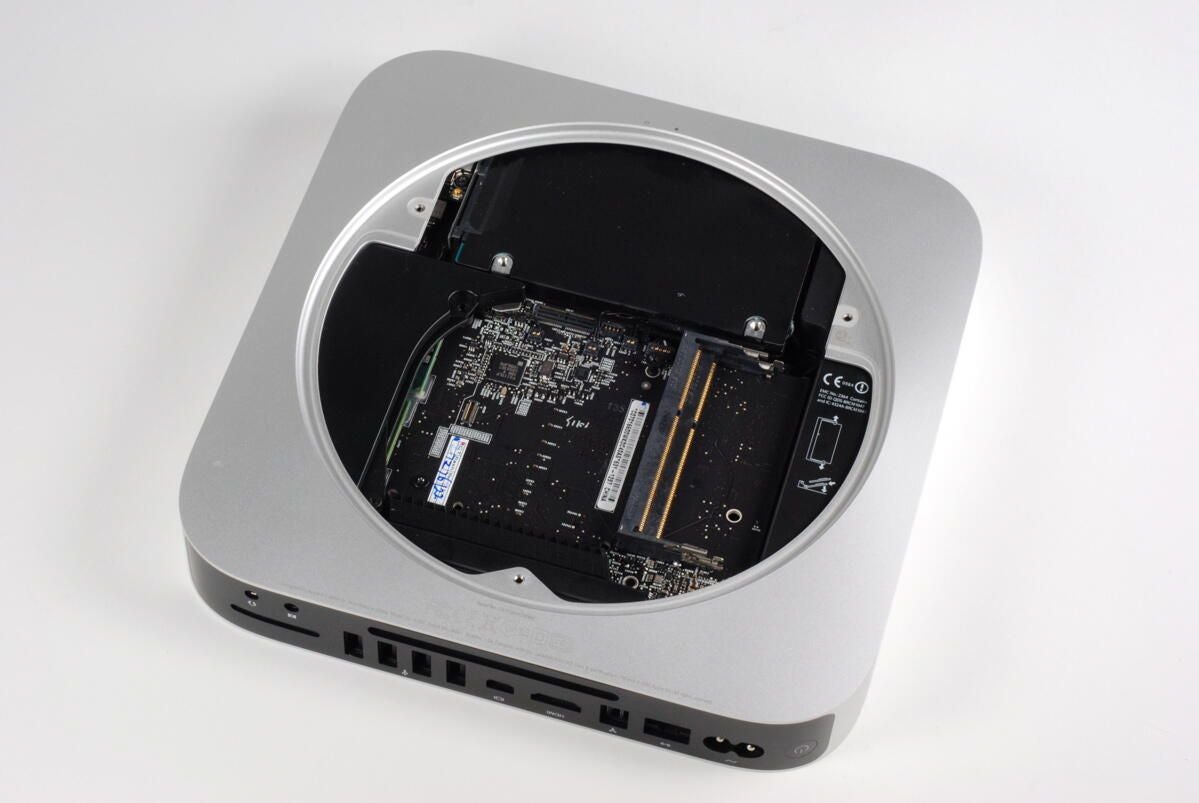
The Mac mini’s access plate can be easily removed by rotating it from the locked position (shown here) to the unlocked position (indicated by the open circle on the aluminum enclosure).
You unlock the Mac mini’s access plate by turning it so that the white dot on the plate aligns with the hollow black circle on the aluminum enclosure.


The Mac mini’s access plate not only allows you to open the machine’s case, but serves as a non-slip surface on which to rest the computer.
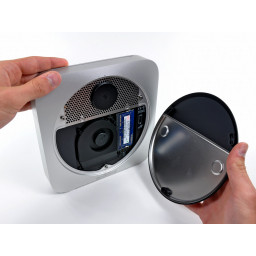
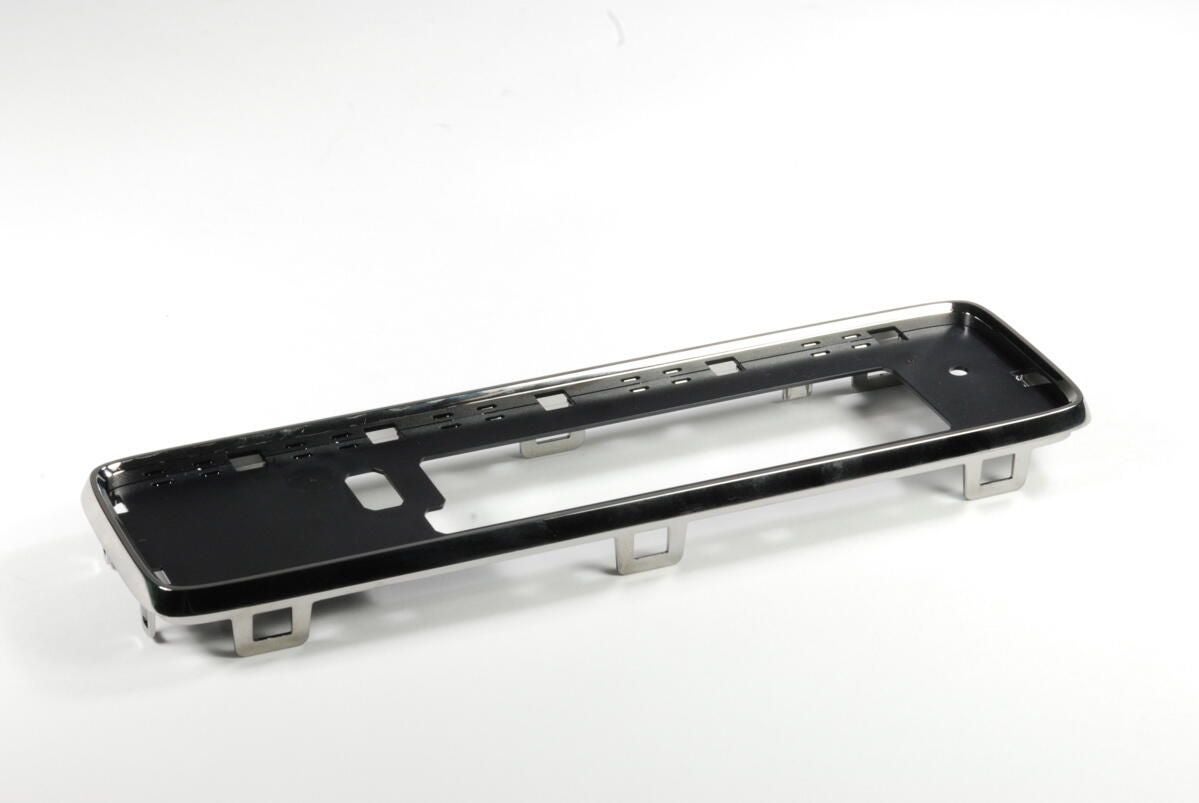
A thin metal shield is attached to the back of the Mac mini’s access plate.

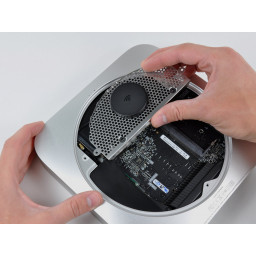
With the access plate removed, we get our fist look inside the Mac mini (A1347). The RAM chips, cooling fan, and Wi-Fi antenna are clearly visible.


Removing the Mac mini Wi-Fi antenna plate screws
There are two more T8 Torx screws holding the Wi-Fi antenna plate in place.

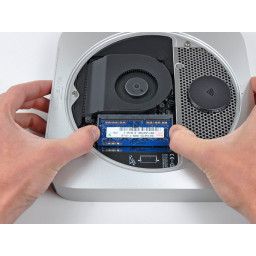
Removing the Mac mini RAM chips
The Mac Mini has two memory slots. Our base model came with 2GB (two 1GB SO-DIMMs) of 1066MHz DDR3 SDRAM. The two slots can support up to 8GB (two 4GB SO-DIMMs).
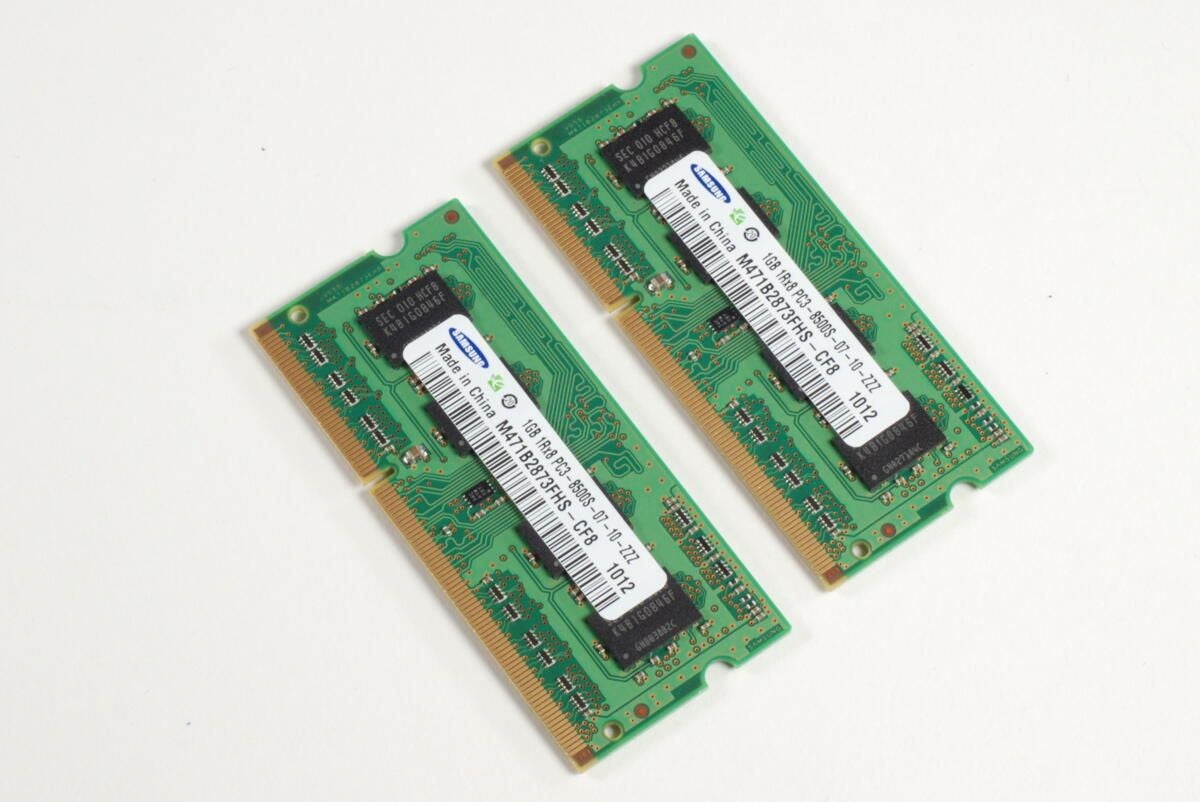
Mac mini 2GB RAM
Two Samsung 1GB 1Rx8 SO-DIMMs

Mac mini RAM chips removed

With the ram remove, you can let the Wi-Fi antenna plate away from the case.
Note: There is a wire connecting the antenna to the AirPort/Bluetooth board. You’ll need to disconnect this wire before removing the plate.
Also, you may want to remove the cooling fan and black plastic cowling (which I do later), before removing the antenna plate. You can slide the plate past these two components, but it’s a tight fit.
Mac mini with RAM chips removed

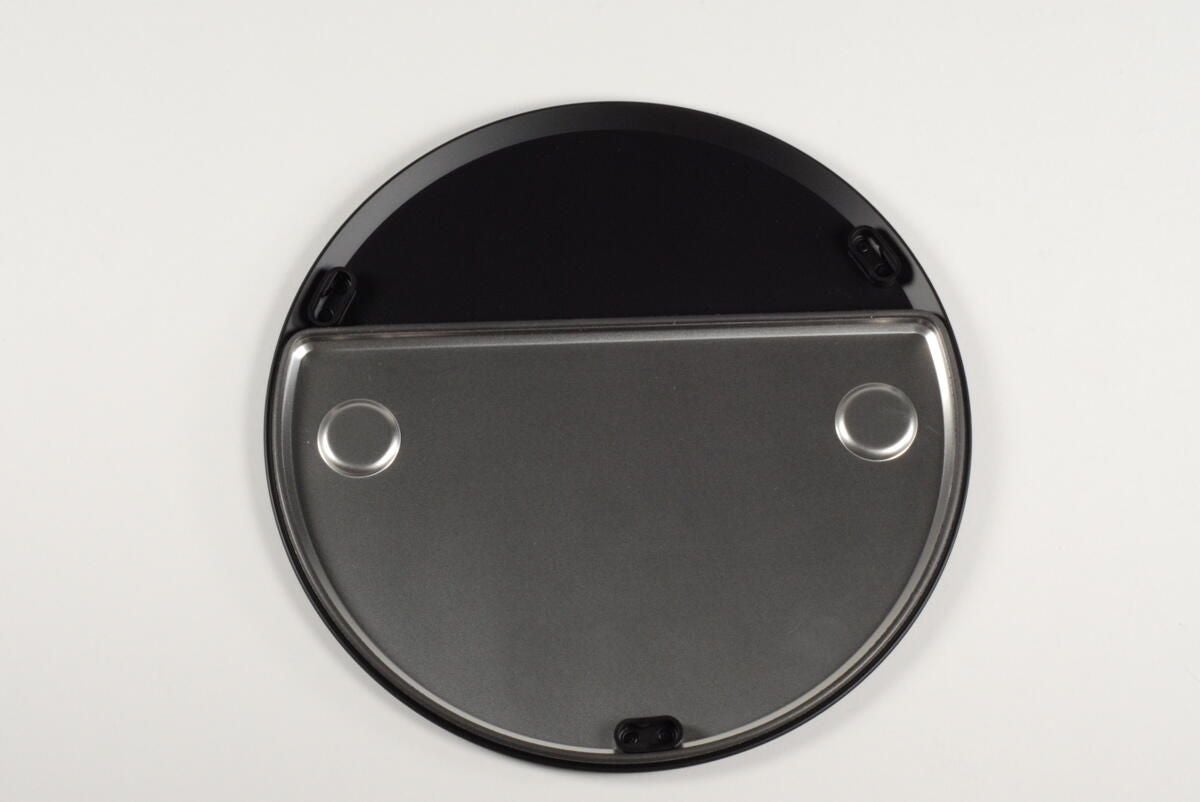
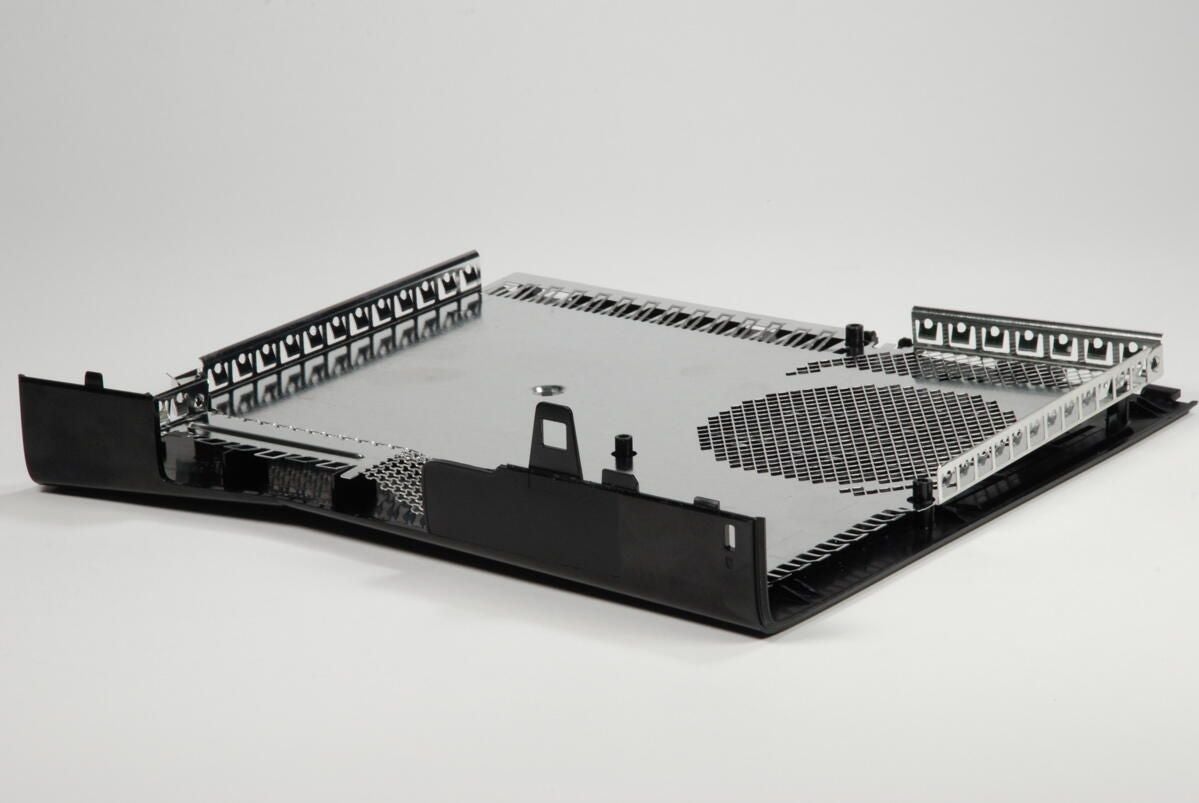
Mac mini Wi-Fi antenna plate — Top

Mac mini Wi-Fi antenna plate — Bottom

Mac mini with Wi-Fi antenna plate remove
With the Wi-Fi antenna plate removed, we can see the 320GB Serial ATA hard drive (glad in black plastic).
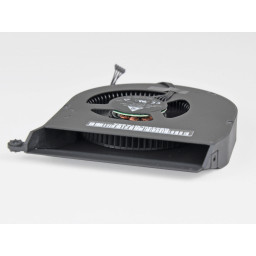
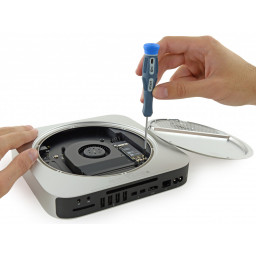
Removing the Mac mini cooling fan
There are two T6 Torx screws that secure the Mac mini’s cooling fan to the logic board.

Lifting out the Mac mini cooling fan
With the screws removed, you can gently lift the cooling fan away from the Mac mini’s unibody enclosure. Before removing it completely, you’ll need to disconnect the wire that connects the fan to the main logic board.

Mac mini cooling fan — Top
The cooling fan is a welcome addition to the redesigned Mac mini A1347.

Mac mini cooling fan — Bottom
Mac mini with cooling fan removed
With the fan removed, we get our first good look at Mac mini’s main logic board.

Mac mini heat sink cowling
With the cooling fan removed, a single T6 Torx screw holds the cowling to the heat sink.

Removing the Mac mini heat sink cowling
You may have to wiggle the cowling to pull it free from the unibody enclosure.

Mac mini with heat sink cowling removed
With the cowling removed, you can see the heat sink beneath.

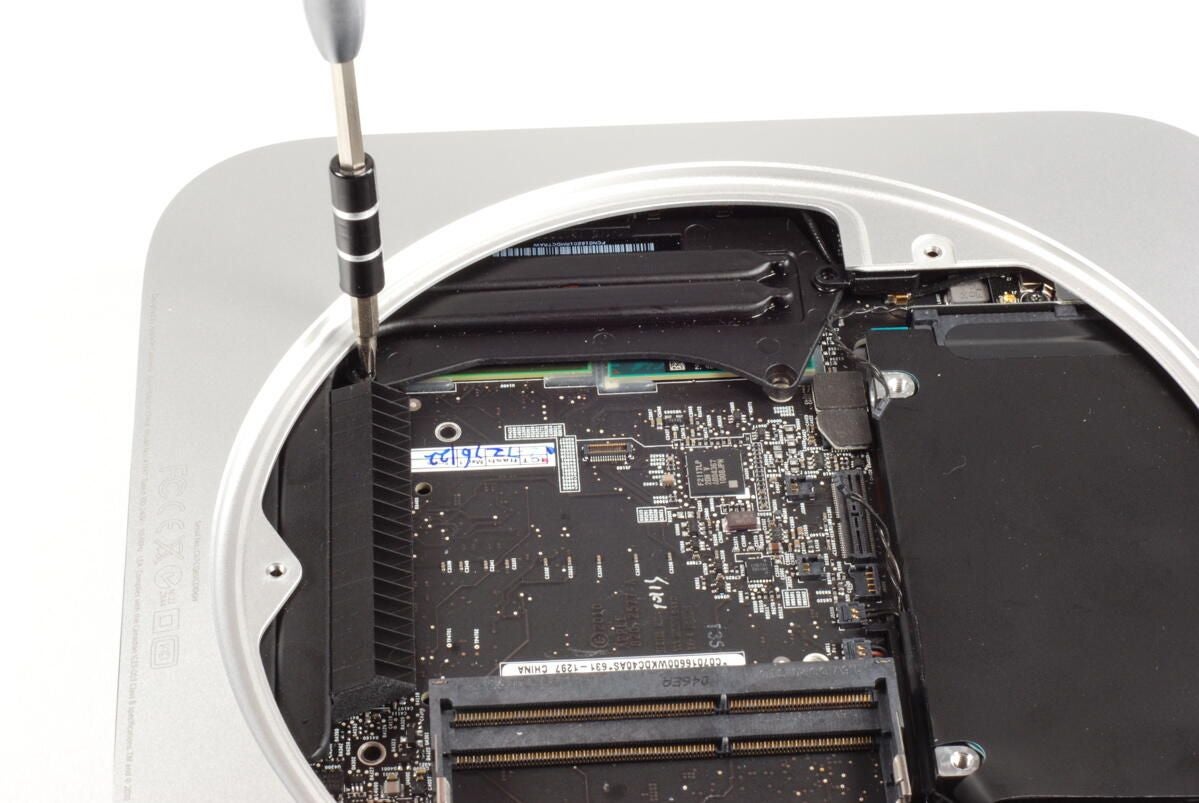
Removing Mac mini logic board screws and standoffs
There are several screws and standoffs that hold the main logic board and hard drive in place. Before proceeding, I removed all of these. Just make sure you note where each screw/standoff goes and some are not interchangeable.

Removing a standoff on the Mac mini logic board
One of the standoffs attached to the Mac Mini’s main logic board.

Mac mini heat sink screw
This screw holds the Mac mini’s heat sink in place.
Second Mac mini heat sink screw
A second screws on the Mac mini’s heat sink.

Mac mini hard drive screw
This screw holds the Mac mini’s hard drive in place.

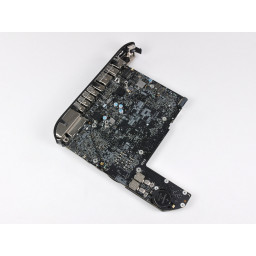
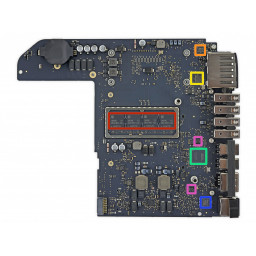
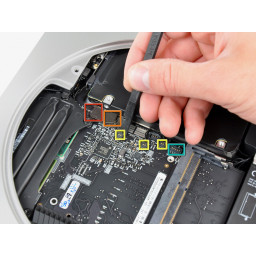
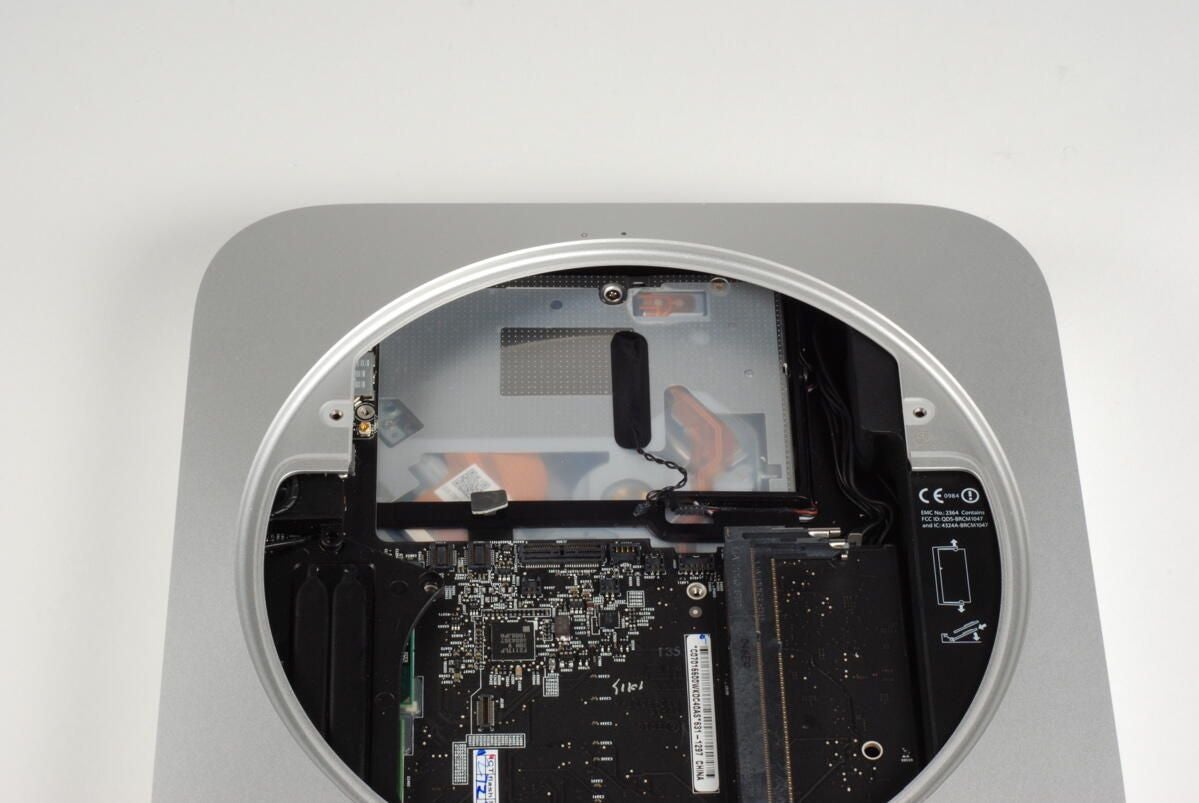
Mac mini main logic board connectors
There are a series of connectors on the Mac mini’s main logic board for the optical drive, hard disk, thermal sensor, and IR senor. You will need to gently disconnect all these cables before removing the logic board from the Mac mini’s unibody enclosure.

Mac mini hard drive and optical drive connectors
The large connectors belong to the hard drive and optical drive.

Mac mini drive thermal sensors and IR sensor connectors
To the right of the drive connectors are two thermal sensor connectors (one for each drive) and the IR sensor connector.

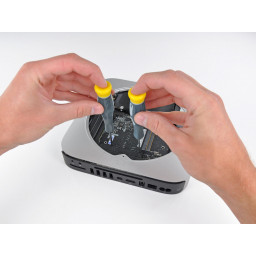
Mac mini logic board remove holes
To remove the Mac mini’s logic board, you’ll need to insert two thin, cylindrical rods into these two holes and gently pry the board and attached components out the back of the unibody enclosure.
Warning: Using any other holes to pry loose the main logic board, could damage the board.

Use screwdrivers to pry loose the Mac mini logic board
Two small screwdrivers work well when prying loose the Mac mini’s main logic board.

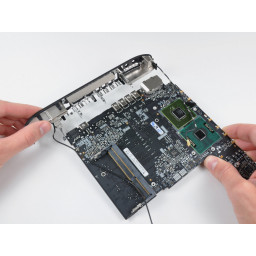
Mac mini main logic board separated from unibody enclosure
Once the main logic board as moved just past the end of the enclosure, you can remove the screwdrivers.

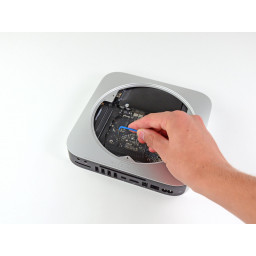
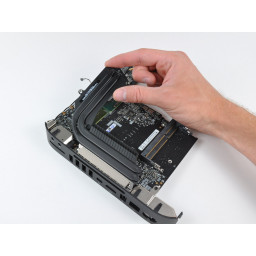
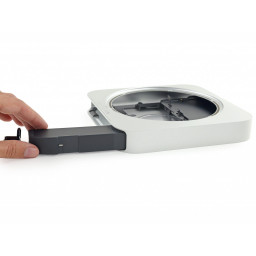
Removing the Mac mini hard drive
With the main logic board shifted, we can remove the hard drive from the Mac mini.

Mac mini 320GB hard drive
Our base model Mac mini came with a 320GB Toshiba HDD2H77 hard drive.
Mac mini with hard drive removed
With the hard drive removed, we can the optical drive below.

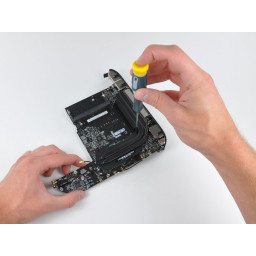
Disconnecting the Mac Mini logic board power connector
Before removing the main logic board, I disconnected the connector to the power supply. With the cable disconnected you can pull the logic board free from the unibody enclosure.

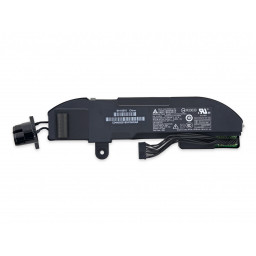
Mac mini main logic board with heat sink, speaker, and wireless card
The heat sink, speaker and wireless card are still attached to the top of the Mac mini’s main logic board.
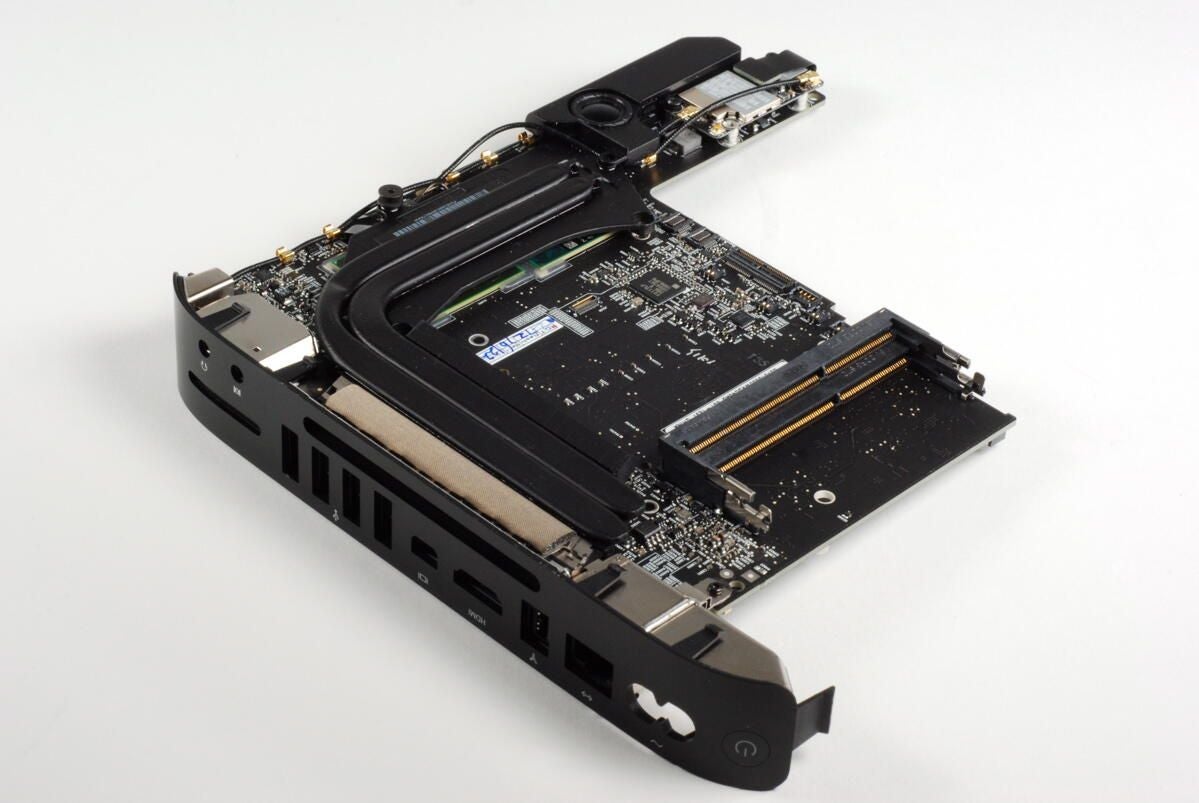
Mac mini main logic board — Ports

Mac mini heat sink (attached)
The Mac mini’s heat sink is mounted over the Intel CPU and NVIDIA GPU, and curves around to the back of the logic board where the cooling fan can move air across it.
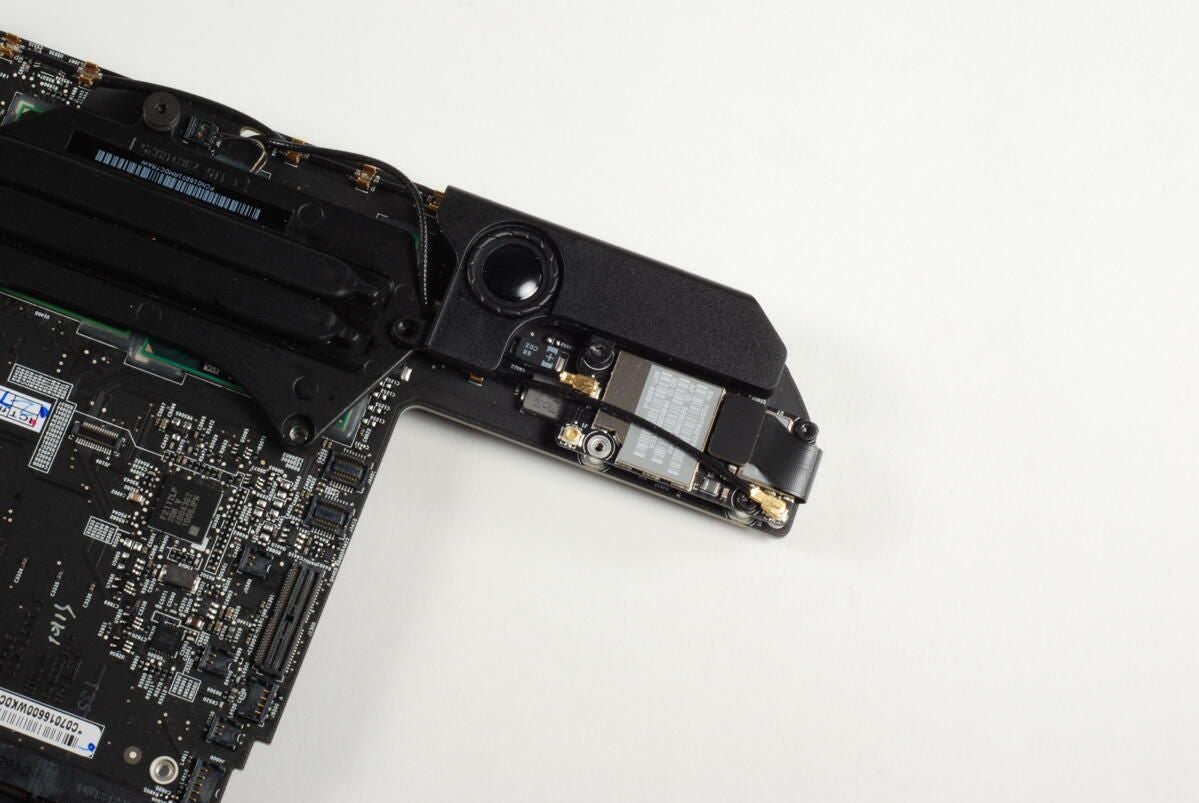
Mac mini internal speaker and wireless card
The Mac mini’s internal speaker and AirPort Extreme card are mounted on this small protrusion on the main logic board.

Mac mini logic board — Bottom
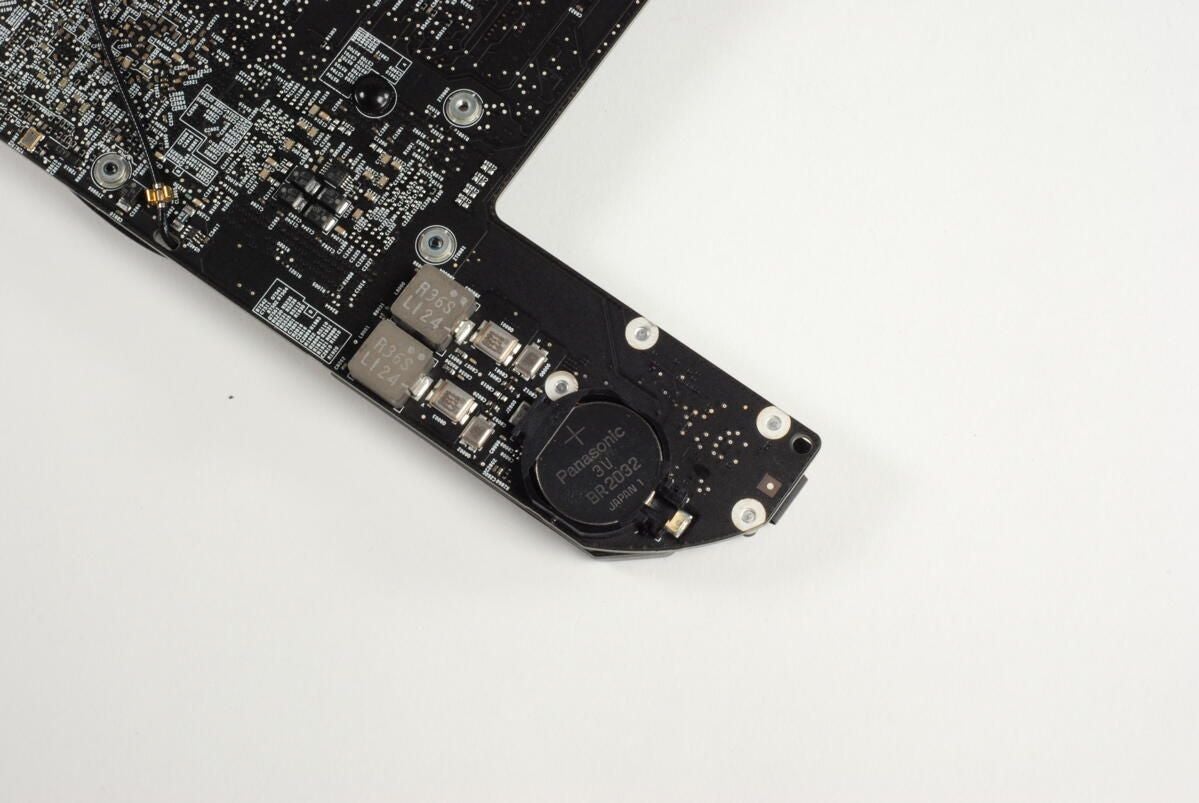
Mac mini logic board system battery
Our Mac mini came with a Panasonic 3V BR2032 system battery.

Mac mini logic board — Back closeup

Mac mini speaker
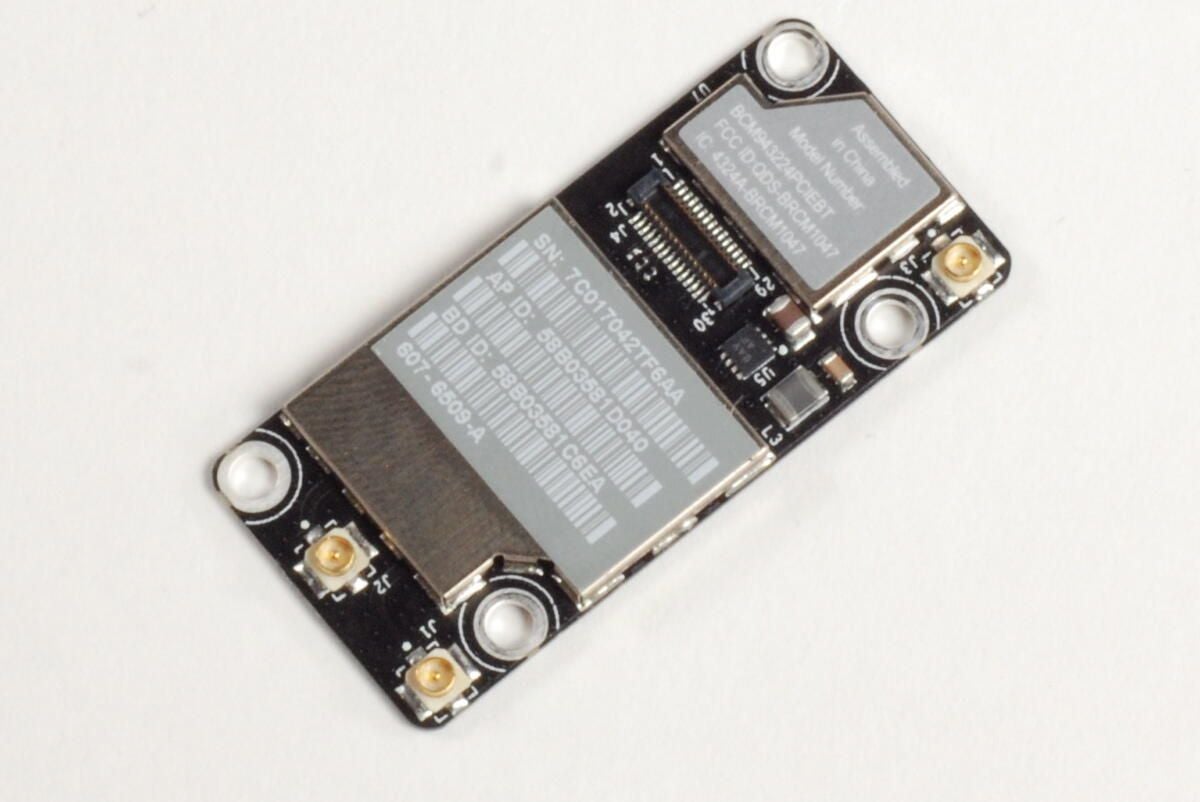
Mac mini Airport Extreme card — Top

Mac mini Airport Extreme card — Bottom
The Mac Mini A1347 has 802.11n Wi-Fi and Bluetooth 2.1. Broadcom appears to have manufactured this card or supplied most of the chips for it as “Broadcom” is clearly marked on the underside of the card.

At this point, a a couple of spring-loaded T8 Torx screws hold the heat sink to the main logic board.

Lifting away the Mac mini’s heat sink
With all the screws removed, you can lift the heat sink away from the main logic board and the CPU and GPU.

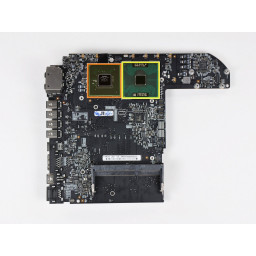
Mac mini A1347 CPU and GPU
On the right, is the Intel P8600 2.4 GHz Core 2 Duo processor. A 2.66GHz CPU is also available.

Mac mini main logic board — Top
With nearly all the internal components removed, we can see the Mac mini’s entire logic board.
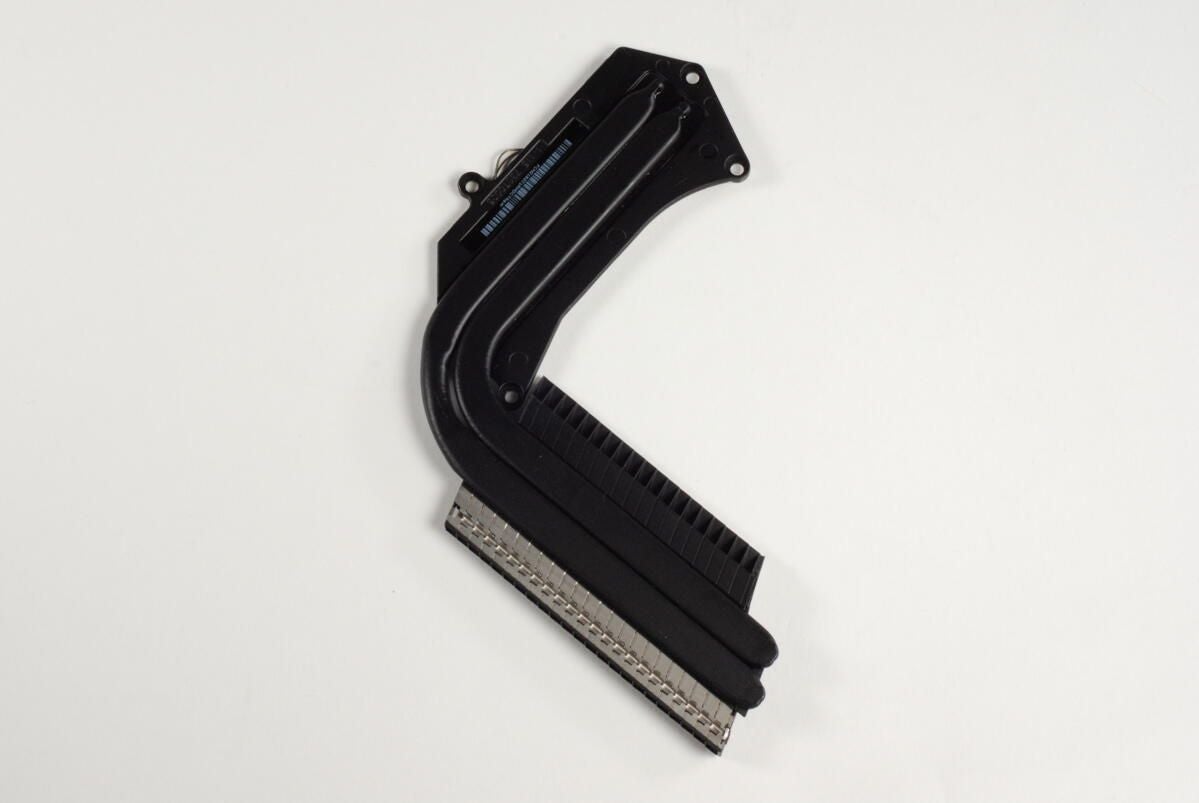
Mac mini heat sink — Top

Mac mini heat sink — Bottom
On the underside of the Mac mini’s heat sink we find the connector for the thermal sensor, the air channels, and the plates that physically connect the heat sink to the CPU and GPU. A think layer of thermal paste is still on the contact plates.

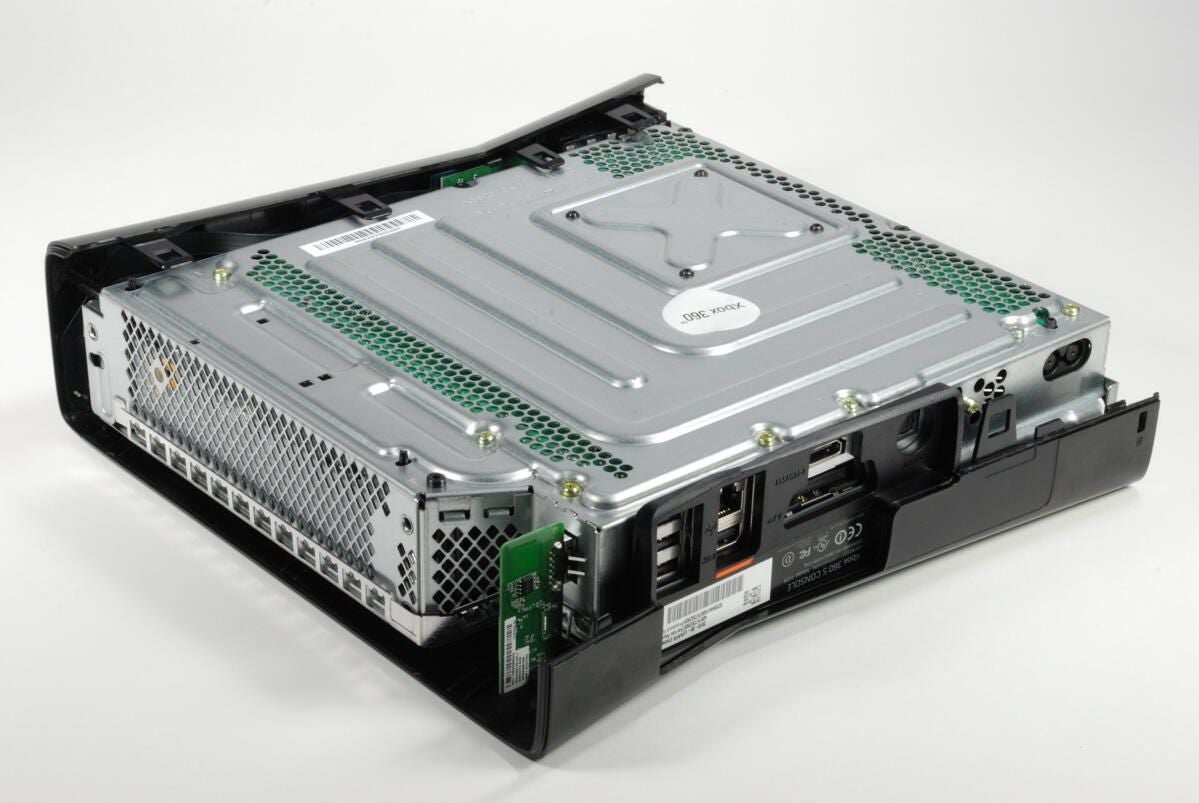
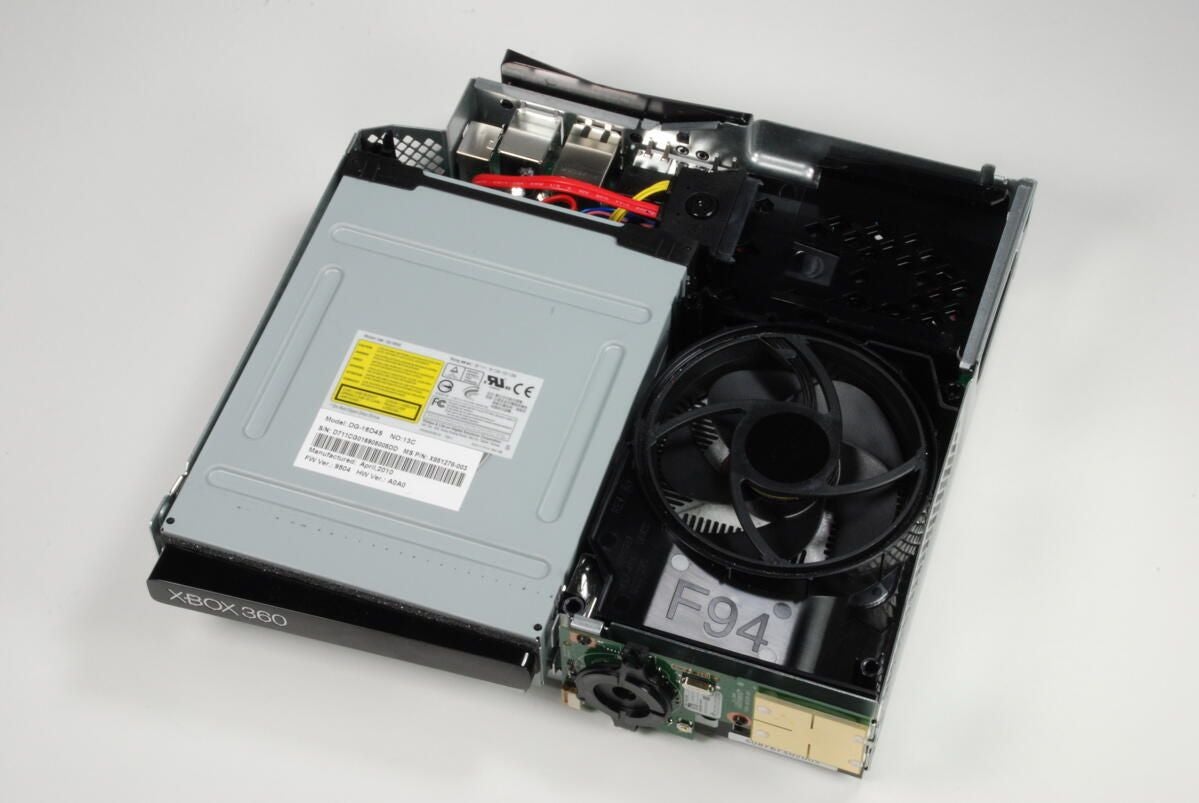
Mac min with main logic board removed
The main logic board removed, all the remains within the Mac mini’s unibody enclosure are the optical drive and the power supply.
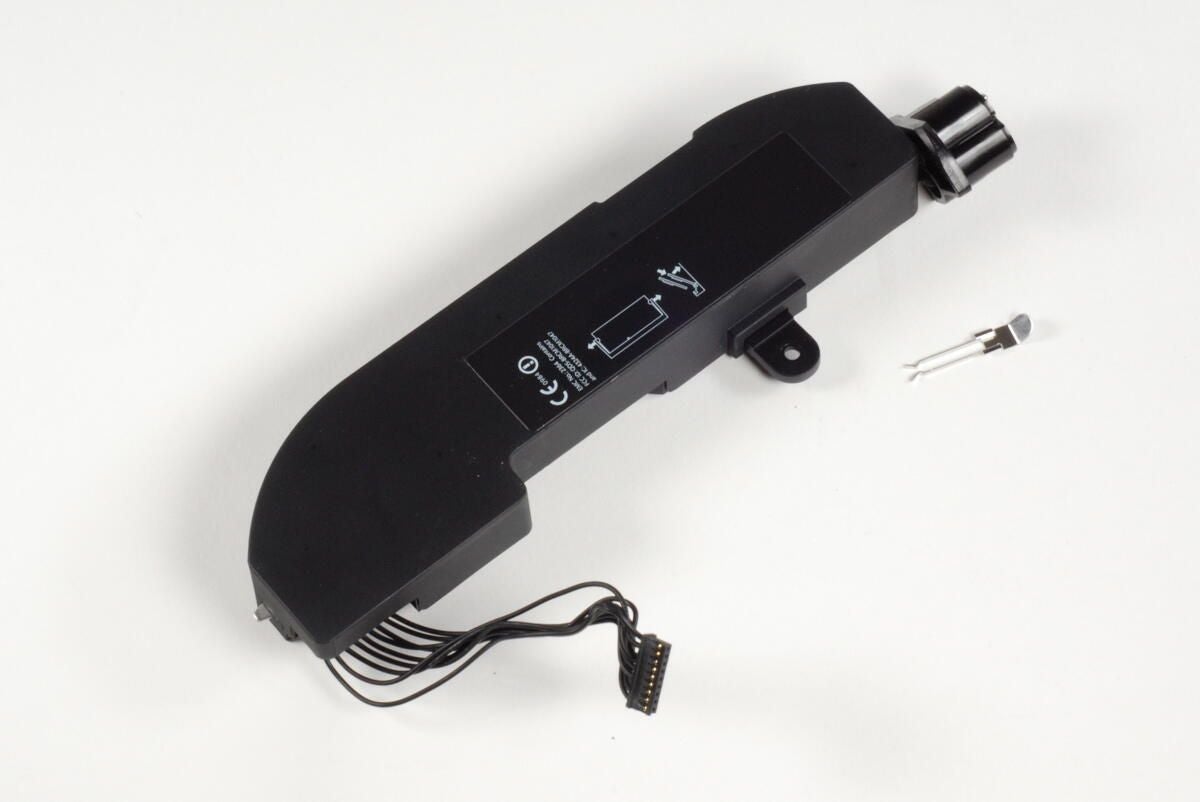
Mac mini power supply — Top

Mac mini power supply — Bottom
Information on the Mac mini’s power supply are located on the underside labels. This unit is a Delta Electronics Model ADP-85AF S rated for 85W of total power.

Mac mini with power supply removed
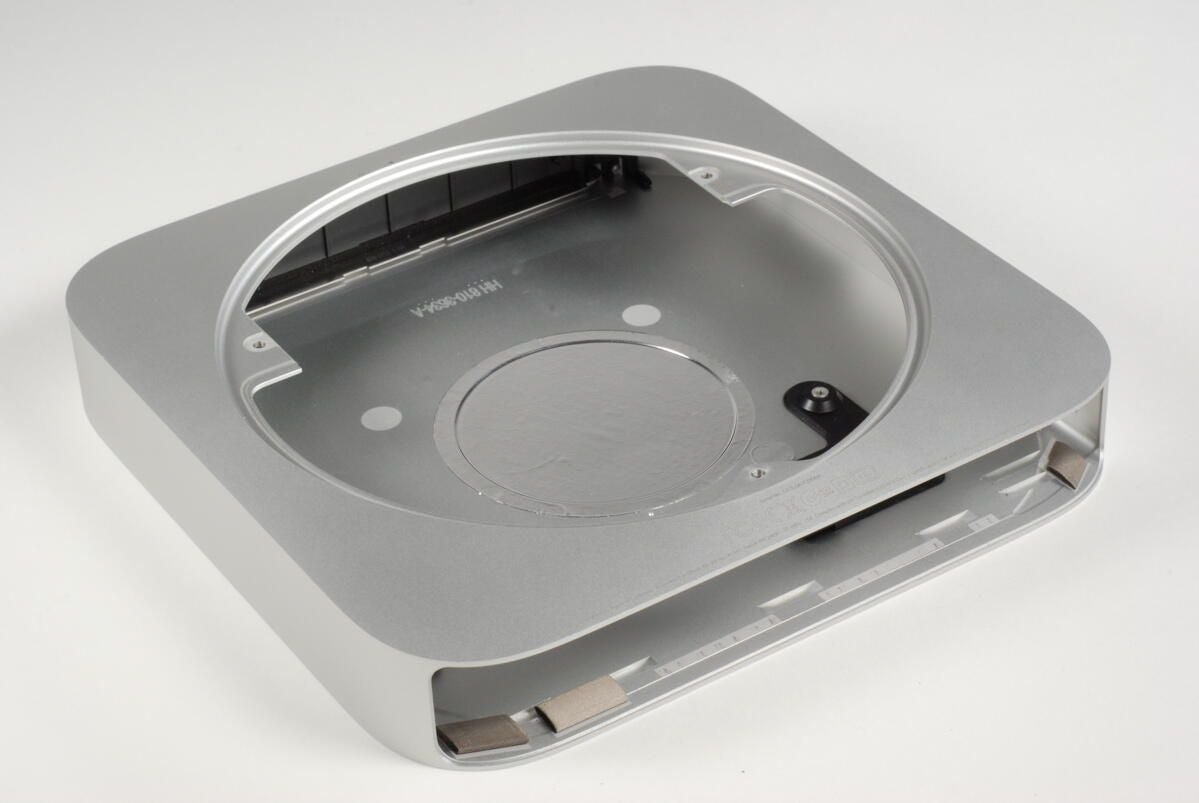
With the power supply removed, only the optical drive remains.
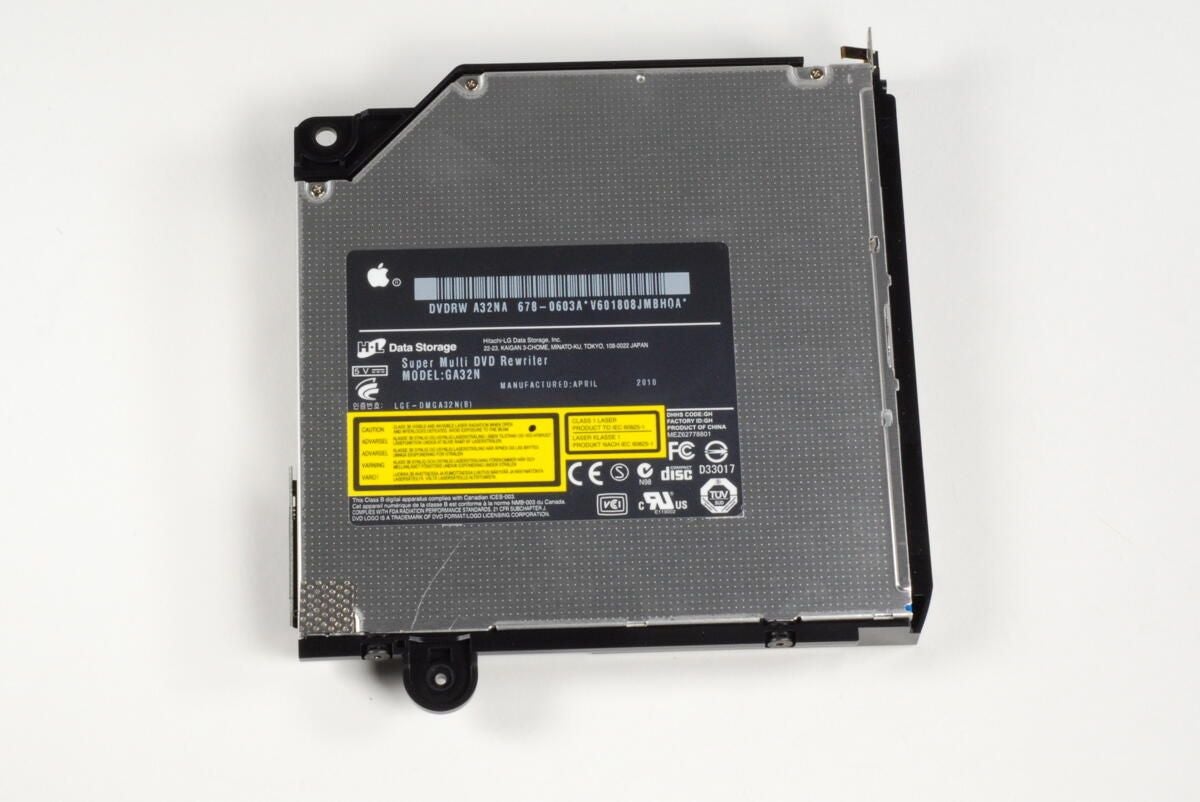
Mac mini optical drive — Top
The Mac mini’s optical drive and plastic frame are removed as a single unit. The Mac mini contains a Hitachi-LG Data Storage Super Multi DVD rewriter — Model: GA32N.

Mac mini optical drive — Bottom

Mac mini unibody enclosure — Front
With all the internal components removed, there’s not much left inside the Mac mini unibody enclosure.
Mac Mini complete teardown
The Mac mini A1347 was significantly easier to disassemble than previous versions. The addition of the bottom access plate, and standard screws make the A1347 a very serviceable, machine.
Additional Information
Operating Impressions, Questions and Answers:
Models
A1347 (EMC 2442 Macmini5,1) 2.3 GHz (Dual i5), A1347 (EMC 2442 Macmini5,2) 2.5 GHz (Dual i5), A1347 (EMC 2442 Macmini5,2) 2.7 GHz (Dual i7), A1347 (EMC 2442 Macmini5,3) 2 GHz (Quad i7)
You can cost-effectively upgrade a number of components in the Mac mini Mid 2011.
A year after its release, the A1347 Mac mini was updated to include a thunderbolt port, Core i5 or i7 processors, and one less optical drive. Apple promised «2x faster everything» for this Mac mini.
This Model can be differentiated from its predecessors by the lack of the optical drive opening in the front of the device and by the thunderbolt port on the back of the device.